I had a somewhat life-changing (too much?) experience at the Nars store in Soho last week. First off, Nars is my favorite make-up brand. Prior to my store visit this week, I’ve always sworn by their face makeup using their bronzer, blush, and tinted moisturizer religiously. I went to the store with the intention of picking out a new foundation, and I came out with a few more products than planned. Hey, I needed them! I sat down to get my face done up by one of their makeup artists. Her name is Caitlin Monahan, featured freelance Nars Makeup Stylist. I later found out she has quite the resume when it comes to makeup and styling. I mean really, I hit the jackpot with her! You can find more info about Caitlin here. You can also follow her on instagram (@darlingcait) and find her on facebook here to check out her work and adventures!
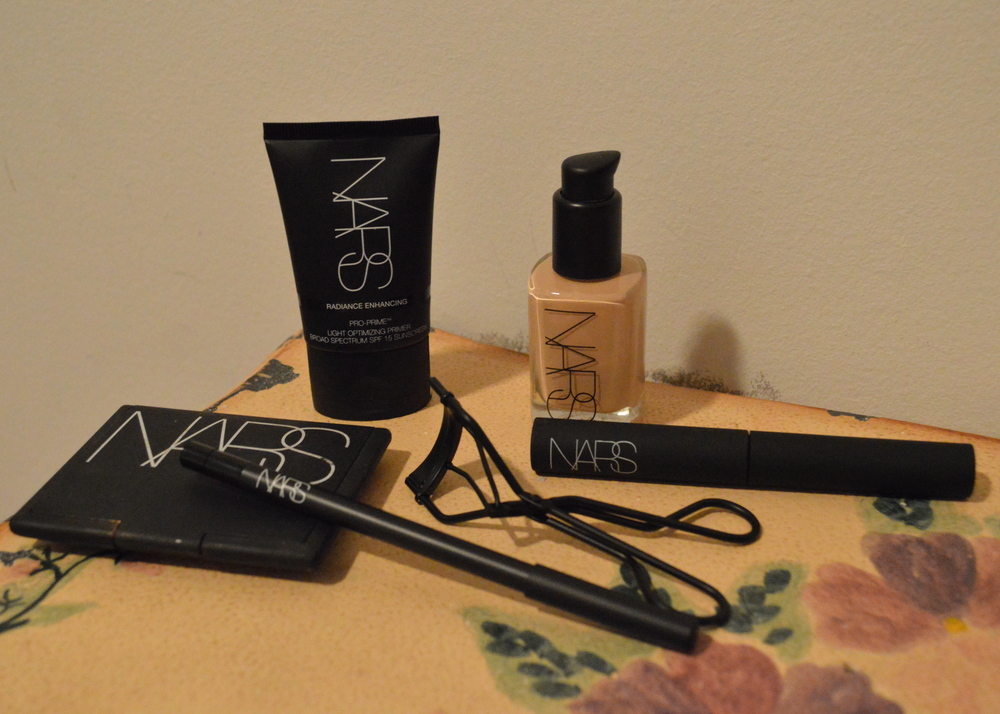
General Skin Prep – Caitlin stressed the importance of your skin care regime prior to putting any makeup on. She used a gel moisturizing treatment and then used their skin moisturizer before using the primer and foundation. As a result, my makeup stayed put all night and my skin felt moisturized.
Sheer Glow Foundation – I needed a new foundation, which is why I came in. I asked about the new luminous foundation that I had been seeing on various beauty blogs. Caitlin didn’t recommend for my skin type because this foundation has a matte finish. I let her know I have dry skin in areas on my face almost year round, so instead she recommended their “sheer glow” foundation.
Primer with SPF 15 – This will give you a really luxurious sheen and prep your skin before makeup. This is pretty crucial if you’re trying to have your makeup stay all day or night. Put this all over your face after your moisturizer and before you apply foundation.
Eye Shadow in “Blondie” – she rimmed my bottom lash line with this color. I loved this. Who knew that such a discreet trick could change your look right away. You can also use on your top lid and layer with other darker colored eyeshadows as an alternative to liquid eyeliner or pencil, which I personally love.
Eyelash Curler – Ok, game changer! I feel like I’m a little late in the game to this, but I have to admit that I didn’t regularly use and own an eyelash curler, until now. Make sure you grab all your eyelashes at once in the curler, as close to the skin as you can without pinching yourself (ow, that could be really painful). Then, clamp the curler three times while applying a little pressure. I instantly felt more glamorous after this step. Holy lashes.
Nars Volumizing Mascara – This stuff won’t flake on you. You can do two coats. For the first coat, you just wiggle diagonally from the roots outward, and second coat straight through your lashes. You can use this over your other mascaras to keep from flaking. I’m finding that layering is key for that dramatic voluminous lash look.
Black Eyeliner Pencil – I found this step a little tough to do myself, but practice makes perfect, right? Basically, lift your top lid and line that tiny inner strip as close to your eyelashes as possible. This is a long-stay liner so it’s not going to move. This makes your eyes literally pop.
Bronzer in “Laguna”– I’ve always sworn by their bronzer. Caitlin applied by stroking in an L shape from my temple inward towards my nose. She also applied on my temples, forehead, upper forehead area and jawline. This really gave me that contour look without looking too overdone.
Blush in “Orgasm”- I’ve always used this shade. It’s super versatile, and can be used on a range of skin tones. She brushed this on in a triangle shape on the apples of my cheeks and then blended it in with a bronzer brush.
Body Glow – I love to feel a little more tan, especially when going out at night. Caitlin said this product was her go-to. She worked a pea size amount mixed in with foundation all over my cheek area, temples and the sides of my nose. This product is perfect for night time when you want to play it off like you’ve just got off the plane from St. Barths.
Highlighting Blush in “Albatross” – This is a game changer in that it gives you that dewey look that is so huge at the moment. She brushed this outside of my eye area, brow bone area, chin, and above my lip. A highlighter is a must and this does the job.
Some of these simple tips and tricks are ones I would have never learned had I not needed to pick up a new foundation! I highly recommend heading into a Nars store and having a consultation. I learned a ton about skincare and my makeup routine. From here, it’s all about practice 🙂

1 Comment
Michelle P.
April 6, 2015 at 5:40 pmI’ve been on the hunt for a highlighter- totally going to try the NARS highlighting blush! Thanks